Please note: confirmation that you have completed each step is required prior to moving to the next step.
The following elements are required on the site plan:
- The general area of the residential structure, including dimensions
- The general area of the driveway providing access to the property
- The general area of the septic system in relation to the residential structure
- The location of the front door of the residential structure
- The location of any known easements (utility, ingress/egress) on the property, if known
- The location of potable water sources (wells, meters) providing water to the residence
- The location of any known wells on property adjacent to the subject property, if known
- Setback dimensions, including at least one from residence to side property line, and at least one from residence to front/rear property line.
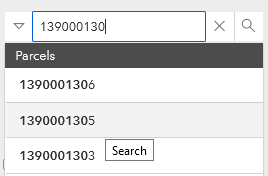
To quickly locate the subject property, enter a valid Parcel ID or Address in the search box. As you type,
suggestions will be provided based on what you enter. Clicking on a suggestion will zoom the map to that location.
If the suggestion does not appear, click the magnifying glass to the right of the search box after fully typing
the Parcel ID or Address. If a match is found, the map will zoom to that location. Alternatively, you can navigate
to the property on the map using the pan (click, hold, and drag) tool in conjunction with the Zoom In/Zoom Out
(Plus/Minus) control in the upper left corner of the map.
The Residential Structure drawing tool allows you to create a rectangular footprint indicating the general location of the home. While many homes are not perfectly rectangular, this tool provides for an approximate area showing the location of the home for Septic Application review purposes. To create a general footprint of the primary residential structure on the property, begin by entering the dimensions of the home in the Proposed Home Length and Proposed Home Width boxes. For the length, use the longest measurement (in feet) of the house (front to back); For width, use the longest measurement from one side (left or right when facing the front door) of the house to the other. Click Create Structure, which will draw a rectangle representing the building's general area at the center of the map. To move the rectangle to a different location, click once inside the rectangle so that you see handles around this shape; next, click inside and hold while dragging the rectangle to the appropriate location. To rotate the rectangle, click inside the rectangle to display handles around the shape, then click and hold the circular handle extended from the box while dragging the shape to rotate it appropriately.
In the event that larger, secondary structures such as detached garages, sheds, pool houses, etc. will exist on the property, and you wish to show those on the site plan, use this tool to indicate their location. This tool operates just as the Residential Structure drawing tool and requires length and width dimensions of the buildings in order to create the shape. You can create multiple buildings using this tool. For each building you wish to show, begin by entering the Length and Width of the structure and then click Create Additional Structure to create the feature at the center of the map. As with the Residential Structure tool, select the shape and drag and/or rotate as necessary to indicate the correct location on the property. Finalize any movement/rotation of one building before creating additional buildings.
To create the approximate location of the driveway as a polygon, begin by clicking the Draw Driveway button to activate the Driveway drawing tool. Click once on the map to start the driveway shape, click once for each turn, and double-click to complete the drawing.
To indicate the Septic Area, begin by clicking the Draw Septic Area button. A 50’ x 50’ square will be created at the center of this map. Select this shape by clicking inside the border, and drag it to the approximate location of the proposed septic system and rotate the shape, if necessary, using the circular handle extended from the outline of the shape.
For any known utility or ingress/egress easements on the property, click the Draw Easement button to activate the Easement drawing tool, and then click once to start the drawing, click once for each turn, and double-click to complete the easement outline.
To indicate the location of the Front Door on the primary residence, click the Mark Front Door button, and then click the location of the front door on the map. An orange point will be created at this location.
To indicate the location of the well that will provide water for the residence, first select the option that applies to your situation, from the choices below.
- My well exists and is on the map.
- My well exists but is not mapped.
- I plan to add a well.
- I will use public water and have a meter.
If the location of wells on adjacent properties is known, indicate those on the map by clicking the Mark Adjacent Well button and then click the location on the map where these wells exist. A blue point will be added to the map at these locations.
To show setback distances on the map, use the two-point line drawing tool to indicate the distances at their respective locations. For each setback, enter the distance (in feet) in the distance entry box, click the two-point button to the right of the entry box, and then click once on the map to start the line and double-click on the map to complete the line. A dashed line will be created on the map between the starting point and ending point, and once the step is complete, the lines will be labeled with the distance entered.
Once all other steps have been completed, you can create a PDF document of your site plan using the Export Site Plan tool. In the Export Site Plan tool pane, click Export Site Plan. The background image of the map will be turned off while the site plan is being created, as the site plan itself does not require the aerial imagery. Once the site plan has been generated, the background imagery will appear on the map, and the Open Site Plan PDF button will appear in the tool pane. Click this button to open the Site Plan in a new tab in your browser. You can download this resulting PDF file to your device and print the document for your records, if necessary.
Use the steps below to create your septic site plan.
Use the search box below to search for your property by Parcel ID or Address. Once you've located your property, check the box to confirm you have located the correct property and click Next Step.
Enter the length and width of the proposed home, in feet, and click Create Structure to place the building footprint on the map. Once the footprint is created, select it with your cursor and drag it to the appropriate location. Rotate the shape, if necessary, using the round handle along the top of the shape. When complete, confirm and click Next Step.
[Optional] If you wish to include the location of an additional structure or structures (shed, detached garage, pool house, etc.) on your site plan, enter the length and width of the structure and click Create Additional Structure to place the building footprint on the map. Move or rotate the shape as necessary. When complete, confirm and click Next Step.
Click the Draw Driveway button below to draw the area (polygon) where the driveway will be located on this property. Click once to start the sketch, once for each turn, and double-click to finish the sketch. When finished, confirm you have completed the driveway and click Next Step.
Click the Draw Septic Area button below to create the proposed septic system site. Select the rectangle that gets created, drag it to the approximate location, and rotate it if necessary to show the desired location of the septic system. Note: This 30'x50' area should mark the general location of the system and does not have to be exact or to scale. When finished, confirm that this feature has been created and click Next Step.
Click the Draw Easement button below to outline where any easements are located on this property. Click once to begin the sketch, once for each turn, and double-click to finish the sketch. When finished, or if no easements exist that you are aware of, confirm that you have completed the step and click Next Step.
Click the Mark Front Door button below and then click the location of the front door on the proposed structure on the map to indicate the location of the front door of the residence. Once you have marked the front door, select the confirmation checkbox and click Next Step.
Which option describes the well status on the property?
Click the Mark Well Location button below and then click the point on the map where the well will be located, to draw your planned or existing well. Confirm and click Next Step to proceed.
Click the Mark Meter Location button below and then click the point on the map where the meter will be located, to mark the location of your water meter.
Mark the location of any known wells on property adjacent to yours. Click the Mark Adjacent Well button below once for each existing adjacent well and then click the map where the well is located to create the well point.
For each setback, enter the distance in feet, click the two-point line button next to the entry box, and then draw the line on the map. Click once to start, and double-click to complete the line.
Mark property line setbacks for additional buildings. For each setback, enter the distance in feet, click the two-point line button next to the entry box, and then draw the line on the map. Click once to start, and double-click to complete the line.
Click the Export Site Plan button below to export the site plan to a PDF document. A progress bar will show while the document is being generated. After a few moments, a link to the document will appear. Click the Open Site Plan PDF button to open the PDF document in a separate tab.